How to fix a bike puncture:
- The first thing to do is flip the bike over, so it is sitting on the handle bars and the seat.
- Loosen the offending wheel. If it is quick release, pull the lever outwards, then unscrew the opposite end (with the knurled nut) until the wheel comes free, usually about 6-8 turns. If has wheel nuts you will need a decent spanner, or if really, really desperate use a shifting spanner. Turn anti clockwise.
- If the bike is fitted with brakes that apply pressure on the rim, you will have to loosen those to be able to pull the tyre from the frame. The cable usually slips into a slot at the end of the caliper (the part near the wheel) if fitted with cantilever or “V” brakes. If fitted with disc brakes, the disc will simply slide out from between the disc pads. Use care. Caliper brakes usually have a small lever at the caliper end that can be rotated to loosen the brake. Sometimes this adjuster is at the lever end (can be just a pin at the top of the lever).
- Once the tyre is off the frame you will need to use a tyre lever to pry between the tyre and the rim to pull the tyre off the rim, taking care to note the position of the tube relative to the tyre (so you can find and remove the cause of the puncture later)
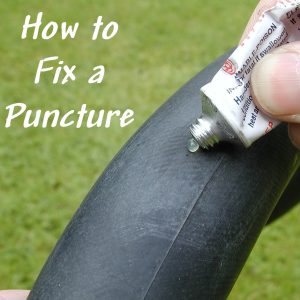
- At Home: After you have removed the tube, fill it with air and cover the whole tube with water and soap. The soap will bubble if there is a hole in the tube. Now that you have located the hole, dry it as well as possible. Then take sand paper and scratch the tube over the tube in an area a little bigger than the patch. This helps the glue bind to the tube and patch. Now you are ready to apply a thin layer of glue over the area you sanded. Usually have to wait a minute or so to allow the glue to become tacky (not dry).
- On the Road: After you have removed the tube, fill it with air and rotate the tube close to your ear, listening for the hiss of escaping air. When you have located the hole, take sand paper and scratch the tube over the tube in an area a little bigger than the patch. This helps the glue bind to the tube and patch. Now you are ready to apply a thin layer of glue over the area you sanded. Usually have to wait a minute or so to allow the glue to become tacky (not dry).
- Once you have repaired the tube, position the tube next to the rim so that the cause of the puncture can be found and removed.
- If the hole is on the outer or side surface of the tube, check the tyre inside and out around that location to find the cause. Often there is glass or a thorn in the tyre, that can only be found by careful examination. Often the offending nail is still back along the road, having made the hole and not been picked up.
- If the hole is on the inside (rim) surface, check the rim and rim-tape for any foreign articles or sharp edges. A rubber rim-tape is often insufficient for a high pressure tyre (over 100psi).
- Reassemble the tyre, taking care to push the valve well into the tyre, to prevent the tyre sitting on top of the valve and failing to seat correctly.
- Refit the wheel onto the bike. If at the rear the gear sprockets fit into the middle of the chain loop. Ensure you carefully align the disc caliper if fitted (it simply slots into the middle between the two disc pads). Once the wheel is re-fitted check that it can spin freely, then inflate the tyre. The correct inflation pressure is marked on the side of the tyre.
- Reconnect the brakes and check both gear operation and braking if it is the rear wheel. Be sure to reset the little rotating lever. If it is the front wheel, ensure the wheel is in straight (vertical) so the brakes pull evenly both sides of the rim.
- Ensure the quick release is re-tensioned, then the lever locked in place, so there is no side (lateral) movement in the wheel.
- Get back on and start pedaling again.